MedVision ad

yosemite (3 Viewers)

tywebb

dangerman
Joined
Dec 7, 2003
Messages
2,173
Gender
Undisclosed
HSC
N/A
Have you tried the new developer preview of OS X 10.10 Yosemite?

It has buiid 14A238x.

After downloading it, you can make a bootable usb this way (different from mavericks):

1. In applications folder, right click on Install OS X 10.10 Developer Preview, choose "Show Package Contents".

2. Open Contents / Shared Support / InstallESD.dmg

3. In terminal enter:

open "/Volumes/OS X Install ESD/BaseSystem.dmg"

4. Using Disk Utility, restore OS X Base System to your USB Stick.

5. On the USB Stick, in System/Installation delete the symlink named Packages

6. Copy Packages from OS X Install ESD to the System/Installation folder on the USB Stick

7. Unhide files from the OS X Install ESD dmg to copy BaseSystem.dmg and Basesystem.chunklist (they are both hidden) and copy them onto the USB stick (not in a folder, top level). You can use the Revealer app to do this. Once copied, hide hidden files again.

8. Restart holding down the option key to boot from from newly created bootable yosemite usb which will appear as "OS X Base System" to install the system. The usb also has a disk utility which can be used to format a drive for clean install.

Note that the boot screen looks different than for lion, mountain lion or mavericks. You have to select disk utility from the menu.

----------------------------------------------------------------------

Alternative method not requiring making any hidden files visible:

Use and 8GB+ USB stick and format it with GUID partition mapping and a partition named Untitled, then run the following 5 commands in terminal:

sudo hdiutil attach /Applications/Install\ OS\ X\ 10.10\ Developer\ Preview.app/Contents/SharedSupport/InstallESD.dmg

sudo asr restore -source /Volumes/OS\ X\ Install\ ESD/BaseSystem.dmg -target /Volumes/Untitled -erase -format HFS+

sudo rm /Volumes/OS\ X\ Base\ System/System/Installation/Packages

sudo cp -a /Volumes/OS\ X\ Install\ ESD/Packages /Volumes/OS\ X\ Base\ System/System/Installation/Packages

sudo cp -a /Volumes/OS\ X\ Install\ ESD/BaseSystem.dmg /Volumes/OS\ X\ Install\ ESD/BaseSystem.chunklist /Volumes/OS\ X\ Base\ System
 
Last edited:

tywebb

dangerman
Joined
Dec 7, 2003
Messages
2,173
Gender
Undisclosed
HSC
N/A
Bootable USB of yosemite installer made with createinstallmedia

In attempting to make a bootable usb of yosemite, people previously had a lot of difficulty with createinstallmedia before and had to resort to using other manual methods. But there is a fix you can do to an Info.plist file in the yosemite installer which will then allow the createinstallmedia unix executable file to work properly.

1. Fix the Info.plist file

Right click on Install OS X 10.10 Developer Preview and then Show Package Contents. Open the Contents folder and then open Info.plist with textedit and change the string value of CFBundleShortVersionString from 1.4.3 to 1.4.1. Save the file.

2. Make the bootable usb

Now format an 8 GB USB drive which should be called Untitled and formatted as Mac OS Extended (Journaled). The installer should be called Install OS X 10.10 Developer Preview.app and should be in your Applications folder.

Run this in terminal and wait about 20 minutes:

sudo /Applications/Install\ OS\ X\ 10.10\ Developer\ Preview.app/Contents/Resources/createinstallmedia --volume /Volumes/Untitled --applicationpath /Applications/Install\ OS\ X\ 10.10\ Developer\ Preview.app --nointeraction

3. Install yosemite

You can boot up and install yosemite from the bootable usb by holding the option key when booting up and then selecting the usb to boot up from that.

4. Fix partitions (including the recovery partition)

If the yosemite installer creates logical volume groups, you can run this in terminal to get your partitions back to normal. This will also make a recovery partition visible when you boot up when holding the option key down.

diskutil cs list

and then

diskutil coreStorage revert lvUUID

where lvUUID is the last lvUUID reported by the previous Terminal command.


You may have to restart for everything to get back to normal after you have run these commands in Terminal.
 

tywebb

dangerman
Joined
Dec 7, 2003
Messages
2,173
Gender
Undisclosed
HSC
N/A
These hacks should not be necessary, so today I have sent a bug report to apple.
 

tywebb

dangerman
Joined
Dec 7, 2003
Messages
2,173
Gender
Undisclosed
HSC
N/A
Developer Preview 2 was released today to developers. It has build number 14A261i.
 

tywebb

dangerman
Joined
Dec 7, 2003
Messages
2,173
Gender
Undisclosed
HSC
N/A
DP3 was released to developers today. It has build 14A283o.

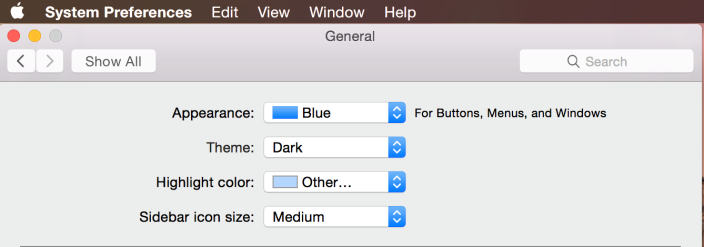
Dark Mode is now enabled.

Just go to apple menu > System Preferences > General

There is now 2 options for "Theme": Light and Dark. Light is the default which everyone is used to already. But the Dark one is new.


It looks like this:

 
Last edited:

tywebb

dangerman
Joined
Dec 7, 2003
Messages
2,173
Gender
Undisclosed
HSC
N/A
Black Boot Screen

Here’s the full list of OS X Yosemite-compatible Macs:


• iMac (Mid-2007 or later)

• MacBook (13-inch Aluminum, Late 2008), (13-inch, Early 2009 or later)

• MacBook Pro (13-inch, Mid-2009 or later), (15-inch, Mid/Late 2007 or later), (17-inch, Late 2007 or later)

• MacBook Air (Late 2008 or later)

• Mac Mini (Early 2009 or later)

• Mac Pro (Early 2008 or later)

• Xserve (Early 2009)

Dark mode is enabled on all these devices.

However the black boot screen is only officially supported on these newer devices:


• MacBookPro10,1

• MacBookPro10,2

• MacBookAir6,1

• MacBookAir6,2

• iMac14,1

• iMac14,3

• iMac14,2

• MacBookPro11,1

• MacBookPro11,2

• MacBookPro11,3

• MacPro6,1

Here is a youtube video of the black boot screen: http://www.youtube.com/watch?v=yZIgLboIiP0

Nevertheless, one can enable the black boot screen on the older machines that support yosemite.

Download, decompress and double click the attached script file. Terminal should open, enter your password, click return and restart twice to enable the black boot screen on the older macs.

(Note: You need to allow applications downloaded from anywhere. If you need to do this, click the apple menu, system preferences, Security & Privacy, under General tab click the lock to make changes, enter password, click unlock, then anywhere, then allow from anywhere)

To undo the black boot screen:

It makes a backup of the old boot.efi file on the desktop. In case you don't like it and want to go back to the old way to boot you can run this in terminal:

sudo chflags nouchg /System/Library/CoreServices/boot.efi

Then copy the backup to /System/Library/CoreServices/boot.efi

Then run these in terminal:

sudo chmod 644 /System/Library/CoreServices/boot.efi

sudo chown root:wheel /System/Library/CoreServices/boot.efi

sudo chflags uchg /System/Library/CoreServices/boot.efi
 

Attachments

Last edited:

tywebb

dangerman
Joined
Dec 7, 2003
Messages
2,173
Gender
Undisclosed
HSC
N/A
DP4 was released to developers today. It has build 14A298i.
 

tywebb

dangerman
Joined
Dec 7, 2003
Messages
2,173
Gender
Undisclosed
HSC
N/A
There is also an itunes 12 update and a yosemite recovery update 1.0.

The yosemite recovery update 1.0 is causing major problems though for the recovery partition.

There seems to be a bug in Yosemite Recovery Update 1.0 which no longer allows the recovery hd to boot from the startup manager available when booting up by holding down the option key. Command R and Command Option R may still work though.

Here is a workarround to get your old recovery hd back. I would recommend not installing the Yosemite Recovery Update again until apple fixes it.

1. Download the Lion Recovery Update from http://support.apple.com/kb/dl1464 . (And before you ask, YES. I mean LION recovery update!) Make sure it is in your downloads folder. If you still happen to have the yosemite DP1 installer somewhere, right click on the Install OS X 10.10 Developer Preview.app file and click Show Package Contents. Go to Contents/SharedSupport/. Copy the InstallESD.dmg file into your Downloads folder. If you don't still have the DP1 installer, you can get it again by redownloading from your purchases tab in your mac app store.

2. Download and decompress the file recovery.sh.zip from http://4unitmaths.com/recovery.sh.zip and move recovery.sh into your Downloads folder if it's not there already.

3. Open Terminal and type the following commands:

chmod +x ~/Downloads/recovery.sh
sudo ~/Downloads/recovery.sh


4. Wait a few minutes for it to finish and return back to a prompt. Reboot with holding down the option key to test your 10.10 recovery partition.
 
Last edited:

tywebb

dangerman
Joined
Dec 7, 2003
Messages
2,173
Gender
Undisclosed
HSC
N/A
Apple released the public beta 1 today. It has build 14A299l. You can get it at https://appleseed.apple.com/sp/betaprogram/

Here is how to make a bootable usb of the yosemite public beta 1 installer. It is much easier than for yosemite DP1 and similar to how you do it for mavericks (but obviously the installer name has changed).

Format an 8 GB USB drive which should be called Untitled and formatted as Mac OS Extended (Journaled). The installer should be called Install OS X Yosemite Beta.app and should be in your Applications folder.

Run this in terminal and wait about 20 minutes:

sudo /Applications/Install\ OS\ X\ Yosemite\ Beta.app/Contents/Resources/createinstallmedia --volume /Volumes/Untitled --applicationpath /Applications/Install\ OS\ X\ Yosemite\ Beta.app --nointeraction

You can boot up from it by selecting it from the startup manager you get when starting your computer and holding down the option key.

But this public beta won't necessarily give access to future developer previews and so I caution developers with DP4 (build 14A298i) not to install this over the top of DP4.

It would be better to install it on a separate partition or virtual machine.
 
Last edited:

tywebb

dangerman
Joined
Dec 7, 2003
Messages
2,173
Gender
Undisclosed
HSC
N/A
How to enable black boot screen for public beta on older computers

There is now a bootEFI command script file that will replace your boot.efi file so as to black-boot older computers starting up from the public beta.

Apple have restricted this even more to only the following by default:

MacBookPro10,1
MacBookPro10,2
MacBookPro11,1
MacPro6,1

So many more computers are going to need this new script file in order to get the black boot screen with the public beta.

To enable the black boot screen on the older machines that support yosemite, download, decompress and double click the attached script file. Terminal should open, enter your password, click return and restart twice to enable the black boot screen on the older macs.

(Note: You need to allow applications downloaded from anywhere. If you need to do this, click the apple menu, system preferences, Security & Privacy, under General tab click the lock to make changes, enter password, click unlock, then anywhere, then allow from anywhere)

To undo the black boot screen:

It makes a backup of the old boot.efi file on the desktop. In case you don't like it and want to go back to the old way to boot you can run this in terminal:

sudo chflags nouchg /System/Library/CoreServices/boot.efi

Then copy the backup to /System/Library/CoreServices/boot.efi

Then run these in terminal:

sudo chmod 644 /System/Library/CoreServices/boot.efi

sudo chown root:wheel /System/Library/CoreServices/boot.efi

sudo chflags uchg /System/Library/CoreServices/boot.efi
 

Attachments

Last edited:

tywebb

dangerman
Joined
Dec 7, 2003
Messages
2,173
Gender
Undisclosed
HSC
N/A
DP5 was released to developers today. It has build number 14A314h. A full installer is also available, which you will need if you want to make a bootable usb. It is easier for DP5 than for DP1.

To make a bootable USB for yosemite DP5, format an 8 GB USB drive which should be called Untitled and formatted as Mac OS Extended (Journaled). The installer should be called Install OS X Yosemite Developer Preview.app and should be in your Applications folder.

Run this in terminal and wait about 20 minutes:

sudo /Applications/Install\ OS\ X\ Yosemite\ Developer\ Preview.app/Contents/Resources/createinstallmedia --volume /Volumes/Untitled --applicationpath /Applications/Install\ OS\ X\ Yosemite\ Developer\ Preview.app --nointeraction
 
Last edited:

tywebb

dangerman
Joined
Dec 7, 2003
Messages
2,173
Gender
Undisclosed
HSC
N/A
Bootable DVD installer

To make a bootable DVD of Yosemite:

After downloading a full Yosemite installer app from the Mac App Store, run these 14 commands in Terminal to create a Yosemite.iso file and then burn it to a dual layer DVD with Disk Utility. You may then boot up from it by holding the option key down and then install Yosemite.

The first one will depend on which installer you have.

The first command:

For DP1:

hdiutil attach /Applications/Install\ OS\ X\ 10.10\ Developer\ Preview.app/Contents/SharedSupport/InstallESD.dmg -noverify -nobrowse -mountpoint /Volumes/install_app

For DP5, DP7 and GM1:

hdiutil attach /Applications/Install\ OS\ X\ Yosemite\ Developer\ Preview.app/Contents/SharedSupport/InstallESD.dmg -noverify -nobrowse -mountpoint /Volumes/install_app

For PB1, PB2, PB3 and PB4:

hdiutil attach /Applications/Install\ OS\ X\ Yosemite\ Beta.app/Contents/SharedSupport/InstallESD.dmg -noverify -nobrowse -mountpoint /Volumes/install_app

For public release:

hdiutil attach /Applications/Install\ OS\ X\ Yosemite.app/Contents/SharedSupport/InstallESD.dmg -noverify -nobrowse -mountpoint /Volumes/install_app

The other 13 commands:

hdiutil convert /Volumes/install_app/BaseSystem.dmg -format UDSP -o /tmp/Yosemite

hdiutil resize -size 8g /tmp/Yosemite.sparseimage

hdiutil attach /tmp/Yosemite.sparseimage -noverify -nobrowse -mountpoint /Volumes/install_build

rm /Volumes/install_build/System/Installation/Packages

cp -rp /Volumes/install_app/Packages /Volumes/install_build/System/Installation/

cp -rp /Volumes/install_app/BaseSystem.chunklist /Volumes/install_build

cp -rp /Volumes/install_app/BaseSystem.dmg /Volumes/install_build

hdiutil detach /Volumes/install_app

hdiutil detach /Volumes/install_build

hdiutil resize -size `hdiutil resize -limits /tmp/Yosemite.sparseimage | tail -n 1 | awk '{ print $1 }'`b /tmp/Yosemite.sparseimage

hdiutil convert /tmp/Yosemite.sparseimage -format UDTO -o /tmp/Yosemite

rm /tmp/Yosemite.sparseimage

mv /tmp/Yosemite.cdr ~/Desktop/Yosemite.iso
 
Last edited:

tywebb

dangerman
Joined
Dec 7, 2003
Messages
2,173
Gender
Undisclosed
HSC
N/A
DP6 was released to developers today. It has build number 14A329f.

Unfortunately parallels desktop won't open after upgrading from DP5 to DP6.

Here is a workaround:

To start parallels 9 under yosemite dp6 run this first in terminal

sudo /Applications/Parallels\ Desktop.app/Contents/MacOS/Parallels\ Service.app/Contents/MacOS/prl_disp_service -e

KEEP TERMINAL OPEN
 

tywebb

dangerman
Joined
Dec 7, 2003
Messages
2,173
Gender
Undisclosed
HSC
N/A
You got that workaround yesterday for free.

But Parallels now have another workaround, but it will cost you US$49.99 do it.

You can upgrade Parallels Desktop 9 to 10 here: http://www.parallels.com/upgradepd10/

The upgrade was released today. Full installs will be available next week.
 

tywebb

dangerman
Joined
Dec 7, 2003
Messages
2,173
Gender
Undisclosed
HSC
N/A
PB2 was released to public beta testers today. It has build 14A329r.

A full installer is available as well as a delta update.
 

tywebb

dangerman
Joined
Dec 7, 2003
Messages
2,173
Gender
Undisclosed
HSC
N/A
DP7 was released today with build 14A343f. A full installer is also available and the commands to make a bootable usb or dvd are the same as for DP5.
 
Last edited:

tywebb

dangerman
Joined
Dec 7, 2003
Messages
2,173
Gender
Undisclosed
HSC
N/A
DP8 build 14A361c was released to developers today as well as PB3 build 14A361p to public beta testers. PB3 also comes as a full installer. You can make a bootable usb for PB3 the same way as for PB1 and 2.
 

tywebb

dangerman
Joined
Dec 7, 2003
Messages
2,173
Gender
Undisclosed
HSC
N/A
A gold master candidate (GM1) was released to developers today (build 14A379a) as well as PB4 (build 14A379b) to public beta testers. Full installers are also available. To make bootable usbs, PB4 can be done with the came command as for PB1, PB2 and PB3 and the GM can be done with the same command as for DP5 and DP7.
 
Last edited:

Users Who Are Viewing This Thread (Users: 0, Guests: 3)

Top